Drupal Basics
In this section we'll cover the basics of using Drupal, including:
Logging in/Out of your Site
-
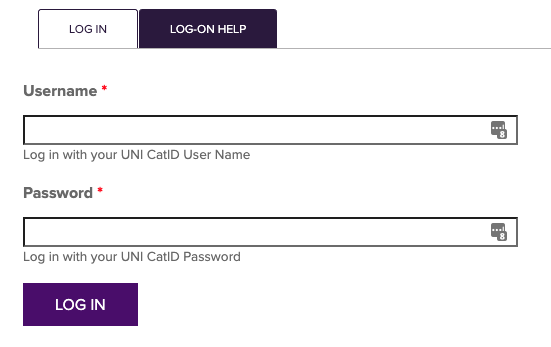
To log into your site, go to your site address and after the uni.edu, enter /user (forward slash and the word user).
(Example: https://ur.uni.edu/user) -
Enter your CatID username and password. Click the ‘Log in’ button.
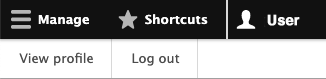
To log-out, click on your username in the black toolbar, then select ‘Log out’
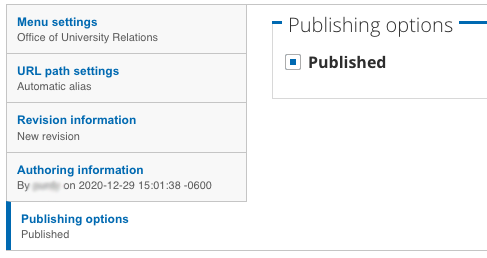
A set of tabs appear on most pages, just below the page title and just above the content.
![]()
View - What the page looks like to users that are not logged in
Edit - Choose this tab to edit the page
Revision - See the revision history for this page; revert this page to a previous version
Pages that are editable will have an ‘Edit’ tab on them. If you do not see an Edit tab, the page is likely created from a feed of content. To update content within this feed, you will have to go to your content overview page and find the appropriate item to update within this list.
In the black and white toolbars across on the top of the page, you’ll find different options to help you maintain and update your website.
The ‘Manage’ tab is where you can find a link to see all of your site’s content (through the ‘Content’ link) and access your site’s menus (through the ‘Structure’ link).
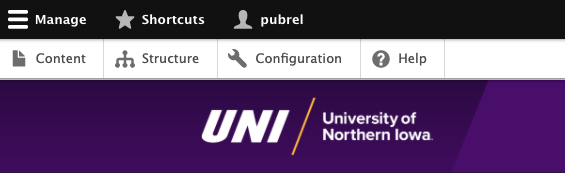
The ‘Shortcuts’ tab is where you will find shortcuts to add content, see all of your site’s content, add a Basic Page, access your site’s menus, and go to the Component Library.
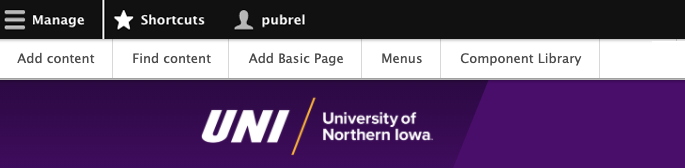
The ‘user’ tab (which will display your CatID username) is where you can find the options to view your profile or to log out of your site completely.
Content
From either the content link in the ‘Manage’ toolbar or from the ‘Find content’ link in your ‘Shortcuts’ toolbar, you can see a list of all content on your site. You can use the filter at the top to display smaller groups of content, search for content by page title, page type, author, whether the content is published or unpublished, and/or what type of vocabulary terms show up on that page.
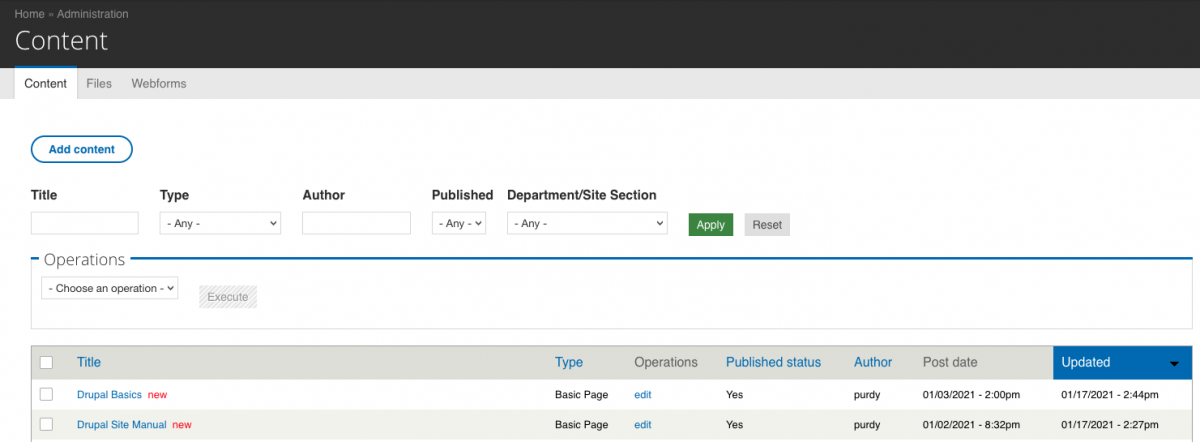
Under the ‘Add content’ link you will find a list of content types you can create within your site.
Basic Page - Used for creating pages on the site. Most of your site will consist of Basic Pages.
The WYSIWYG (What You See Is What You Get) menu is similar to a Microsoft Word formatting palette so you don’t have to know HTML to format your content. You can format text as bold or italic. Your text alignment can be left, right or centered. Your text can be formatted as bulleted or numbered lists. The default text format is normal (paragraph body copy), but you can format headings at the top of paragraphs.
![]()
FORMATTING WITH WYSIWYG EDITOR
The first item you see in your toolbar is the heading dropdown.
Headings use a hierarchy. There are six levels of heading hierarchy: Heading 1-Heading 6. Heading 1 tells the search engine (and screen reader) “The following information is the most important thing on this page.” Every Web page must have one Heading 1, and there should be only one as it typically is used for the page title. You will notice that the WYSIWYG menus in most Drupal sites at UNI are missing Heading 1 because it has already been applied to the page title automatically.
Headings help search engines like Google find relevant content in your pages so that your page will appear towards the top of the search results list. Also, some users with disabilities such as blindness or cognitive issues have software that read Web pages to them.
The proper use of Headings on the Web is one of the most important usability features for screen reader users.
To the right of the styles dropdown are buttons for:
- Bold
- Italic
- Align Left, Center, Right
To the right of the alignment buttons is an icon that looks like a piece of paper with the corner folded down. This button is for Content Templates.
Selecting one of the templates provided may be used create columns on the page.
Create a Link
![]()
Links should use text that tells the user what will happen when they click. Search engines and screen readers scan pages to find links. If Google or a screen reader scans a page only to find 20 links that read ‘Click Here,’ the search fails.
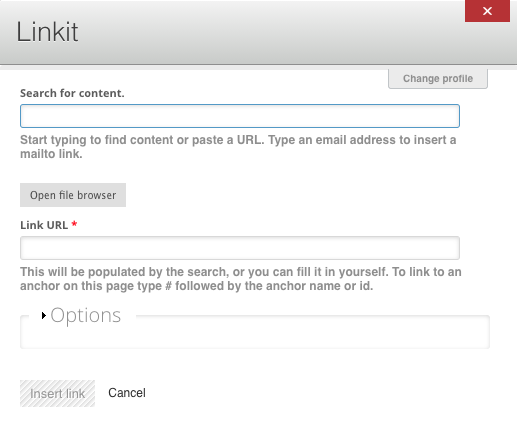
To create a link, highlight the relevant text, then choose the Insert/Edit Link icon (Chain link icon with + sign) in the WYSIWYG toolbar, which will open a dialog box.
To link to another page within the site, begin typing the page title you would like to link to in the Search for Content field. From there you can simply select the page. To link to a page on an external website, manually type (or copy and paste) your link into the Link URL box and choose ‘Insert link’
To link to a document (such as a PDF): Highlight the relevant text, choose the Insert/Edit Link icon, then select the ‘Open file browser’ button.
Either choose from the list of files already uploaded, or use the Upload menu item in the top left. If you choose to upload, select the Browse (or Choose File, depending on browser) button. Use the window that opens to find your file. When the file name/location appears in the file box, choose the Upload button. The file will automatically be selected (highlighted in blue), then select Insert to finish the process.
A web page is generally more accessible than a PDF, so if at all possible, create a new page rather than linking to a PDF.
On sites that need anchors for long pages, the flag icon may be used to add link anchors.
Insert an Image
![]()
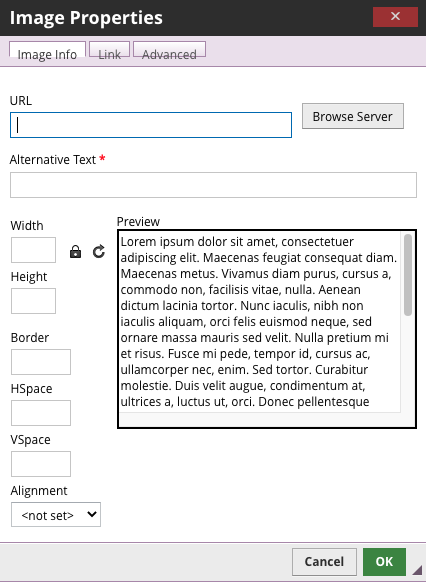
To insert an image, put your cursor in the approximate location you want the image and select the Insert Image icon (the mountain icon)
You will get an Insert/Edit image dialog box (right). Select the ‘Browse Server’ button (like linking to a document earlier), browse, then upload your image. Be sure to add alternative text (a description of the image) before clicking OK.
IT IS VERY IMPORTANT TO ADD ALTERNATIVE TEXT.
Since a screen reader cannot see an image, you need to add some alt (alternative) text
to images. Some screen readers cut off alt text after 125 characters, so be succinct. The main question you should ask yourself is, “Why is this image used? What message is it supposed to convey?” It is important to realize that the alternative text is a replacement for the image, not a description of the image.
You do not need to start with “image of _” or “graphic of _” as the assistive technology will do that when reading out the page.
You should not use images of text, but if there is text in your image (like a logo), use that text as the alt text.
If (and only if) the image is purely decorative and conveys no meaning (like an image that separates one paragraph from another) you can type a space in the alt text box and Drupal will create what is called empty alt text (alt=””).
In the Image Properties window are also the means to format text around an image. A preview of how the text will appear with the image is in the box to the right.
To make text flow around your image, choose an Alignment.
You can resize your image in Dimensions and as long as the Constrain proportions padlock is selected, it will resize uniformly. If you resize your image, you should only make it smaller as enlarging it will make it pixelated (fuzzy).
You can create horizontal or vertical space (in pixels) so your text doesn’t bump up against your image. Horizontal is left and right; vertical top and bottom. A unit of 10 is usually about right.
Insert a Video
![]()
To insert a video, place your cursor in the body field where you would like the video to show and then click the video button (the film strip icon).
The ‘Add Video’ dialogue box will open up. Inside of this dialogue box are the following options:
URL - The URL of the video you would like to add. Typically this is restricted to YouTube videos only.
Width - The width of the video. Height - The height of the video.
Align - Whether you would like the video left, center, or right align (or not aligned at all). !
Autoplay - Selecting autoplay means the video will start playing as soon as the user visits the page. You should never use autoplay. Not only can this be jarring for the user, but it is an accessibility issue as well.
Link your Page to a Menu
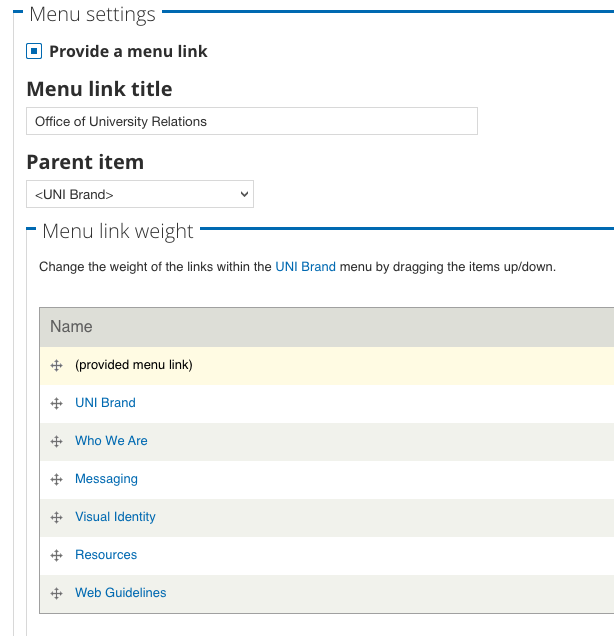 Your new page is automatically added to a menu, uncheck the Provide a menu link box to not include it in a menu.
Generally speaking, the Menu link title needs to be the title of the page. The link title will fill in automatically from what you entered in the page title. From the Parent item dropdown list, you need to choose which menu you want the link in. In most cases this should match the Department/Site Section chosen at the top. In the Menu Link Weight window, you can rearrange the menu item to the order you want them to be in. Nesting is limited to 2 levels.